

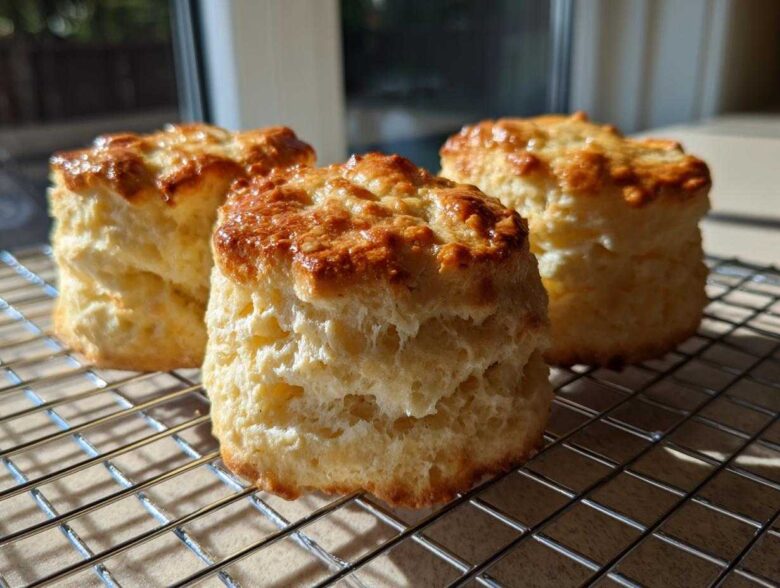
There’s just something unbeatable about a warm baked good fresh from the oven, isn’t there? You know, the kind that fills your entire house with that incredible, comforting smell? Well, friends, I’ve finally cracked the code. For years, I struggled with flat, dense little biscuits masquerading as scones. But no more! This recipe is, without a doubt, the best scones recipe you will ever try. We are talking about achieving those majestic, tall, flaky layers that look like they came straight out of a fancy London tea shop. If you’ve ever been afraid of messing up scones and ending up with hockey pucks, put that fear away! I promise, this is the one.

Why This is the No Fail Scone Recipe You Need
I call this my no-fail recipe because it strips away all the fuss and focuses only on what makes a truly great scone: texture. Forget dry, crumbly disappointments! These babies are engineered for lift and tenderness. If you follow these steps, you are guaranteed success, every single time. I even linked to some other great tips over on the blog if you want a deeper dive.
- Perfectly crumbly light scones that melt in your mouth.
- Guaranteed height—you will get those lovely, layered tops.
- Super quick prep time means you can whip these up even on a busy morning!
Achieving Tall Bakery Style Scones
It all comes down to two things: coldness and silence. Seriously! Your butter and buttermilk need to be ice cold. When that cold butter hits the hot oven, it creates steam pockets, and that’s what pushes your scones upward, giving you those beautiful tall bakery style scones.
The other huge secret is handling. You mix just until it *barely* comes together. If you overwork the dough, you develop too much gluten, and the scones freeze up instead of puffing up. Finally, when you cut them, press straight down—don’t twist the cutter! Twisting seals the edges and stops them from soaring upwards. Precision here really matters for that perfect rise.
Ingredients for Classic Buttermilk Scones
Okay, let’s talk about what goes into these beauties. The ingredient list for classic plain scones recipe perfection is actually so straightforward, which is why they are perfect for a quick breakfast treat. Seriously, you probably have most of this stuff already! Remember, for that amazing rise we just talked about, the temperature of these items matters more than anything else.
This recipe yields about 8 gorgeous scones, perfect for sharing (or maybe not, I won’t judge!). Having everything measured out and ready to go before I even pull my mixing bowl out helps me stay organized, especially since we have to work fast once the butter hits the flour.
- 2 cups all-purpose flour
- 1/4 cup granulated sugar (Just the white stuff here; we save the complex molasses flavors for cookies!)
- 1 tablespoon baking powder (This is doing a lot of the heavy lifting for the rise, so don’t skimp!)
- 1/2 teaspoon salt
- 1/2 cup (1 stick) cold unsalted butter, cut into small cubes. I mean fridge-cold, straight-from-the-fridge cold!
- 3/4 cup cold buttermilk. If yours is room temperature, pop it in the freezer for five minutes first!
- 1 large egg, lightly beaten (This is just for brushing on top for that beautiful golden shine.)
How to Make Perfect Scones: Step-by-Step Instructions
Getting this process right is where the magic happens for achieving those fluffy buttermilk scones. Remember, we are moving fast from here on out so that butter stays cold! First thing, get your oven cranked up to 425 degrees F (220 degrees C). If you preheat now, it’ll be ready right when the dough is done mixing. Line a baking sheet with parchment paper—it just makes cleanup a breeze, trust me.
We whisk the flour, sugar, baking powder, and salt together first. Once those dry things are happy, we introduce the star of the show: the cold butter cubes. This is your workout! Use a pastry blender, or grab your hands (make sure they are cold!), and work the butter into the flour until it looks like coarse oatmeal, with some pea-sized guys still floating around. Those bigger chunks are what create those flaky layers in your scones!
Preparing the Dough for Fluffy Buttermilk Scones
Now, make a little nest in the middle of your buttery flour. Pour in all that ice-cold buttermilk at once. Don’t be shy! Use a fork—not your hands yet—and mix it just until it pulls together into a shaggy mass. I mean it: stop stirring the second you don’t see streaks of dry flour anymore. Overmixing here is the enemy of crumbly light scones. If you see me mixing past this point, just slap the spoon out of my hand!
Cutting and Baking Your Scones
Turn that shaggy dough right out onto a lightly floured counter. Pat it gently—no kneading allowed!—until it’s about 3/4 of an inch thick. I usually aim for a rough circle or square because it’s faster. Then, use a sharp cutter to cut out about 8 wedges or rounds. Place them close together on your prepared sheet. Putting them close actually helps them push up higher instead of spreading out wide! Give the tops a quick swipe with that beaten egg wash. Bake them for 12 to 15 minutes until they’re beautifully golden brown. You can check out my full tutorial notes for visual guides on the mixing technique right here.
Ingredient Notes and Substitution Ideas for Scones
I know sometimes you just don’t have buttermilk hanging around in the fridge, and it feels like a huge roadblock when you just want to make scones right now! Don’t panic. The most vital thing about this recipe is the COLD, remember? Cold butter, cold liquid. That’s the structural key to getting those lofty heights.
If you’re out of actual buttermilk, you can make a super quick substitute. Just take regular milk—whole milk is best—and stir in one tablespoon of white vinegar or fresh lemon juice for every cup of milk you need. Let that sit on the counter for about five or ten minutes until it looks slightly curdled. Voila! You have makeshift buttermilk. It works just as well in this recipe because we need that acid reacting with the baking powder.
Also, while I’m giving advice, let’s talk about the sugar. For these classic plain scones recipe bases, I stick to granulated sugar because it doesn’t interfere with the chemical rising process as much as brown sugar can. If you wanted to pivot towards something richer, like those maple pecan scones everyone loves, you might swap a tablespoon or two of that white sugar for brown, but stick to the cold rule!
If you’re curious about taking these golden beauties in a completely different direction, maybe towards something cheesy, check out some of my favorite things to add over on my savory scone ideas page where we mess around with cheddar and chives!
Creative Variations for Your Next Batch of Scones
Once you nail the basic method for scones—and trust me, you just did—the world opens up! This base recipe is so versatile, it practically begs you to customize it. I love switching things up depending on the season or what mood I’m in. Suddenly, we aren’t just making classic plain scones recipe; we’re making celebrations!
You can easily turn this into fantastic cranberry orange scones by tossing in half a cup of dried cranberries and zesting one orange into the dry mix along with the sugar. The bright citrus lifts the whole flavor profile. Or, if you use that leftover pumpkin puree from last week, you can sprinkle in some pumpkin spice and call it a day for lovely pumpkin spice scones!
Sweet Scones for Afternoon Tea
If you’re planning a proper scones for afternoon tea situation, you need chocolate or amazing fruit pairings. White chocolate and raspberry? Heavenly. Just fold in 1/2 cup of white chocolate chips and 1/3 cup of fresh or frozen raspberries right at the very end of the mixing process. They look stunning on the platter! For a real treat, I sometimes attempt what I call cinnamon bun scones, where I make a cinnamon-sugar swirl dough, but honestly, that takes more finesse than this quick scone recipe allows, so I stick to inclusions!
Savory Scone Ideas
Don’t think scones have to be sweet, either! If you want something perfect for a brunch alongside eggs, ditch the sugar entirely (or drop it down to just one tablespoon). Then, mix in shredded sharp cheddar cheese and some fresh thyme or rosemary. They become hearty and delicious. For a more robust experience, you can always check out some of my dedicated recipes focusing on that cheesy goodness over on my savory scone post!
Serving Suggestions and Scone Glaze Recipe
So, your scones have come out of the oven, they are towering perfectly, and the aroma is killing you! What now? Well, you can absolutely eat them immediately, straight up. But if you want to go full traditional British style, you need to serve them warm with clotted cream—if you can find it—and a dollop of good strawberry jam. That simple combination is heaven; it really lets the buttery flavor of the classic plain scones recipe base shine through.
However, if you happen to be making something sweeter, like those promised cranberry orange scones, a little drizzle on top really finishes the job. It’s completely optional, but it makes them look so pretty on the table. If you’re feeling experimental, check out how I use a crumb topping on these apple pie bars; that could be adapted for a nice textural contrast on a plain scone!
Here is a ridiculously easy scone glaze recipe that sets up nicely but stays soft enough to bite through:
- 1 cup powdered sugar (sifted is best!)
- 2-3 tablespoons milk or fresh lemon juice
- 1/2 teaspoon vanilla extract (optional)
Just whisk those three things together in a small bowl until you get a smooth, pourable consistency. If it’s too thick, add a tiny splash more milk. If it’s too runny, add a pinch more powdered sugar. I drizzle this over the cooled scones, but honestly, I sometimes just dip the tops right in while they are still slightly warm. It gives them that extra sweet pop. Enjoy trying it out!
Storage and Reheating Instructions for Scones
Now that you’ve made the absolute perfect batch of scones, you have to deal with the heartbreaking reality that you might not eat them all in one sitting. But don’t you worry! Even the next day, these will still taste incredible, provided you store them right. I never put mine in the fridge, honestly. Cold air dries out baked goods so fast, and we worked way too hard for those tall, fluffy layers to let them turn hard!
For the best experience, just keep them at room temperature. You want an airtight container, like a good cookie tin or a sealed zip-top bag. If you leave them on the counter uncovered, they will go stale before breakfast tomorrow. They stay perfectly tender for about two days this way. If you really need them to last longer, you can freeze them unglazed, which is a lifesaver for busy weeks.
But my favorite thing to do is reheat one if I want that ‘just out of the oven’ experience a day later. It takes literally two minutes, and it revives all that buttery flavor and tenderness we worked for. It makes them taste like you just pulled them from the oven this morning!
How to Reheat Scones for Maximum Fluffiness
If you’re eating them plain, scones reheat beautifully in the oven. Set your oven to 300 degrees F—you don’t want it too hot, or you’ll just re-bake the outside and dry them out again. Then, wrap your scone snugly in a little bit of aluminum foil. Just wrap it up like a little present!
Pop that foil-wrapped scone in the oven for about 8 to 10 minutes. When you unwrap it, the inside will be steaming hot and light again. That slight wrap traps enough moisture to bring them back to life without making them soggy. If you’re feeling really lazy, a microwave works, but be careful! Microwave them for only 10 to 15 seconds on medium power. Any longer and they’ll get chewy fast. This is how I manage to enjoy leftover easy homemade scones all week long!
Frequently Asked Questions About Making Scones
I know you guys are getting pretty serious about your scones now that you’ve mastered the technique! Baking is all about solving little mysteries, so here are some of the questions I get most often when people try this no fail scone recipe for the first time. Seriously, don’t worry if you have questions—everyone does when they start! You can see some other random baking thoughts I’ve compiled over on my main index page, even though it’s not scones!
What is the secret to making scones light and crumbly?
We talked about it before, but this is worth repeating because it’s the *whole* game plan! The secret to getting those incredible crumbly light scones is a two-part punch. First: you MUST use ice-cold butter cut into small pieces. Those cold butter chunks need to stay intact until they hit the oven so they can turn to steam that forces the dough open.
Second: handle that dough like it’s a newborn puppy—very gently! Mix only until the liquid is just incorporated. The moment you start kneading or stirring excessively, you activate gluten, and your lovely, light scones turn into dense, sad little hockey pucks. Less handling equals more fluff!
Why are my scones flat instead of tall?
Ah, the flat curse! Nine times out of ten, flatness comes from using ingredients that weren’t cold enough, like using too-warm buttermilk, which prevents that explosive steam rise. Or, you might have overmixed the dough, developing too much gluten, which locks the structure down flat.
Another reason I see often? Twisting the cutter! If you twist when you cut the rounds, you seal the sides together, essentially gluing the layers down. Always press straight down with one firm motion, lift, and place it on the sheet. That firm, unsealed edge gives the scone room to shoot straight up toward the ceiling!
Can I use regular milk instead of buttermilk for scones?
Yes, you absolutely can, but you need to help it along! If you don’t have buttermilk, that’s okay—use whole milk (or 2% if that’s all you have). For every cup of regular milk you need, mix in one tablespoon of white vinegar or fresh lemon juice. Let it sit for about five minutes so it curdles slightly. This slight acidity does the trick, chemically mimicking buttermilk and keeping your rise perfect for these fluffy buttermilk scones.
Can I skip the egg wash?
You can, but honestly, why would you? The egg wash is what gives you that gorgeous, deep golden crust that makes these scones look so professional. If you skip it, they will still bake fine, but they will look pale and matte. If you don’t want to use a whole egg, just whisk up the white with a tiny bit of water, or even just use a splash of milk or cream instead. It’s an optional step for appearance, but worth the two seconds it takes!
Estimated Nutritional Data for Classic Buttermilk Scones
Now, you know I am not a nutritionist—I’m a baker who loves butter! So, please take this data with a huge grain of salt, just like you would with any online recipe. This is just an estimate based on the common ingredients I listed for these classic plain scones recipe bases.
I tried to keep this recipe on the lighter side—these are easy homemade scones, after all, not dessert bombs! But remember, if you load yours up with clotted cream and jam, or add extra mix-ins like the chocolate chips we talked about for those white chocolate raspberry scones, your numbers are definitely going up!
Here’s a rough breakdown based on 8 servings, as noted in the recipe details:
- Serving Size: 1 scone
- Calories: 280
- Sugar: 6g
- Sodium: 350mg
- Fat: 14g (Don’t panic, most of that is good butter fat!)
- Saturated Fat: 9g
- Carbohydrates: 33g
- Protein: 6g
We keep the fiber low because, well, they’re scones and not whole-grain loaves! But seeing those numbers reminds me just what a perfect partner these are for an afternoon cup of tea. Hopefully, this gives you a little peace of mind while enjoying your perfectly baked treats!
PrintPerfect Fluffy Buttermilk Scones

A straightforward recipe for classic buttermilk scones that results in a tall, tender, and light crumb every time.
- Prep Time: 15 min
- Cook Time: 15 min
- Total Time: 30 min
- Yield: 8 servings
- Category: Breakfast
- Method: Baking
- Cuisine: American
- Diet: Vegetarian
Ingredients
- 2 cups all-purpose flour
- 1/4 cup granulated sugar
- 1 tablespoon baking powder
- 1/2 teaspoon salt
- 1/2 cup (1 stick) cold unsalted butter, cut into small cubes
- 3/4 cup cold buttermilk
- 1 large egg, lightly beaten (for egg wash)
Instructions
- Preheat your oven to 425 degrees F (220 degrees C). Line a baking sheet with parchment paper.
- In a large bowl, whisk together the flour, sugar, baking powder, and salt.
- Add the cold butter cubes to the dry ingredients. Use a pastry blender or your fingertips to cut the butter into the flour until the mixture resembles coarse crumbs with some pea-sized pieces of butter remaining. This step is key for flakiness.
- Make a well in the center of the mixture. Pour in the cold buttermilk all at once.
- Use a fork to mix the ingredients just until they come together into a shaggy dough. Do not overmix.
- Turn the dough out onto a lightly floured surface. Gently pat the dough into a 3/4-inch thick circle or rectangle.
- Cut the dough into 8 wedges or use a round cutter to cut out scones. Place the cut pieces onto the prepared baking sheet, setting them close together for taller scones.
- Brush the tops lightly with the beaten egg wash.
- Bake for 12 to 15 minutes, or until the tops are golden brown and the scones are risen.
- Transfer the scones to a wire rack to cool slightly before serving.
Notes
- Keep all your ingredients, especially the butter and buttermilk, very cold. Warm ingredients prevent the scones from rising properly.
- Do not twist the biscuit/scone cutter when cutting; press straight down to maintain the layers.
- For extra height, you can gently fold the dough over itself two or three times before patting it out for the final cut.
Nutrition
- Serving Size: 1 scone
- Calories: 280
- Sugar: 6
- Sodium: 350
- Fat: 14
- Saturated Fat: 9
- Unsaturated Fat: 5
- Trans Fat: 0
- Carbohydrates: 33
- Fiber: 1
- Protein: 6
- Cholesterol: 55