

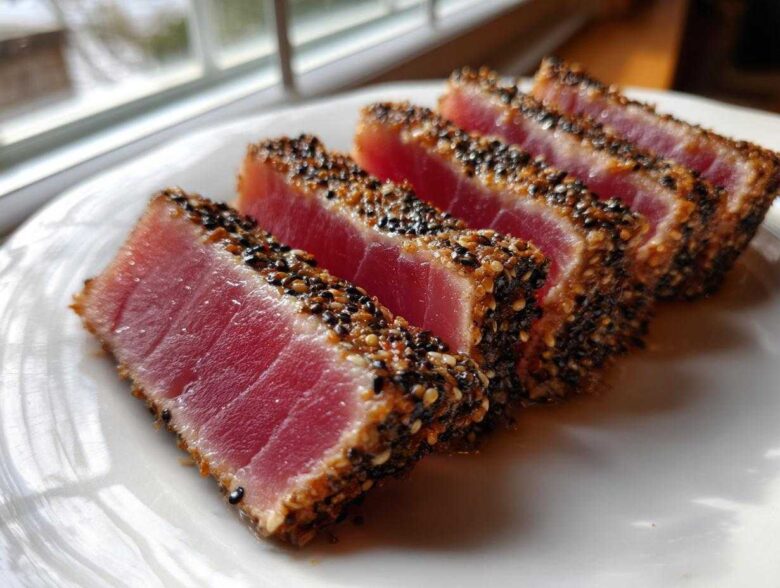
If you’ve ever stared longingly at that beautifully crusted, meltingly pink tuna steak at a fancy restaurant and thought, “I could never make that at home,” well, I’m here to tell you—you absolutely can! Handling delicate fish feels intimidating, I get it, but trust me after years of trial and (a few smelly) error, I finally nailed the technique for perfect Seared Ahi Tuna. This recipe is my absolute go-to because we’re talking restaurant-quality flavor and sear in under ten minutes total. Seriously, it’s faster than delivery!
Why This Quick Seafood Recipe for Seared Ahi Tuna Works
I know what you’re thinking: ‘Gourmet fish in under ten minutes? No way!’ But honestly, this recipe cuts out all the complicated steps that slow down other seafood dishes. It’s so straightforward, which means you get incredible flavor without spending your whole evening over the stove. It’s my secret weapon for when I want something truly delicious but I’m starving!
Here’s the breakdown on why this quick seafood recipe is my favorite:
- Speed Demon: We are looking at about 9 minutes total, prep included, before you’re slicing into this gorgeous fish.
- The Quality Matters: Because we are only searing the outside, using high-quality sushi grade tuna is non-negotiable. It ensures that amazing, almost velvet texture in the middle.
- Perfect Crust: The sesame crust, kissed by that rich marinade, gives you amazing texture contrast without overpowering the delicate flavor of the yellowfin tuna itself.
Essential Ingredients for Perfect Seared Ahi Tuna
Okay, let’s talk about what you need to pull this off. Since this is such a fast cook, the ingredients have to be top-notch. You only need a few things, but they all play a big role in building that amazing, slightly savory crust. I always buy my Ahi steaks frozen, then let them thaw overnight in the fridge. That way, they are super cold when they hit the hot pan—that’s crucial for success!
Here’s what you’ll need for two magnificent servings:
- Two beautiful 6-ounce pieces of sushi grade tuna steaks—please don’t skimp here; it makes all the difference!
- 2 tablespoons of wonderful sesame oil for that nutty base.
- 1 tablespoon of soy sauce or tamari if gluten isn’t your friend.
- 1 teaspoon of freshly grated ginger—it has to be fresh, trust me!
- 1 clove of garlic, minced up tiny!
- A mix of 1 tablespoon each of black sesame seeds and white sesame seeds for that gorgeous speckled crust.
- Just a pinch of black pepper to finish.
Now, for my expert tip on sourcing the fish: If you can ask your fishmonger specifically for yellowfin tuna meant for raw consumption, you are gold. If they look hesitant or say it was just sitting out today, walk away. This fish is treated gently, so you want to buy it that way. We are only kissing the edges with heat, so the quality has to shine through!
Ingredient Notes and Substitutions for Seared Ahi Tuna
Because this recipe is so simple, we follow the ingredients to the letter, but there are a couple of easy swaps if you need them. If you’re running low on soy sauce, Worcestershire sauce can technically work in a pinch for depth, but you’ll want to cut back on the amount because it’s much saltier. The biggest non-negotiable, however, is the quality of the fish.
I mentioned tamari above, and I want to reiterate that. If you need this to be gluten-free, swapping the soy sauce for tamari is the easiest way, plus it has a slightly richer, deeper flavor, which I personally love. Remember, we are depending on the flavor of that high-quality sushi grade tuna to carry the dish, so make sure those steaks are bright crimson and smell clean—never fishy!
Mastering the Marinade and Sesame Crust for Seared Ahi Tuna
This is where we prep our beautiful tuna steaks for their quick trip to the hot pan. We start by making this incredibly simple flavor bomb that acts as our glue for the sesame seeds. Grab a tiny bowl—no need to dirty a big one!—and whisk together your sesame oil, soy sauce, that zesty fresh ginger, and the minced garlic. Don’t beat it senseless; just whisk it until it looks happy and combined. Then, grab a pastry brush or even the back of a spoon and lovingly coat *every single surface* of your tuna steaks with this mixture. It should feel slightly slick, ready to cling to flavor!
Next up is the crust application. Spread your black and white sesame seeds out onto a clean, rimmed plate. Now, the pro tip, and pay attention here: you need to gently but firmly press the coated tuna into the seeds. Don’t try to roll it; you’ll just tear the already moist sides. Instead, place the steak down and push *down* with the palm of your hand to seat those seeds deep into that marinade. Get the sides perfectly coated too! If you press hard enough, the seeds physically bond with the marinade, which means they won’t shed off when we sear over high heat. Seriously, take your time pressing them in—this is what gives you that gourmet crunch!
The High-Heat Searing Technique for Seared Ahi Tuna
This is the moment of truth, friends! Don’t chicken out now—the secret to beautiful Seared Ahi Tuna that’s rare inside and crunchy outside lies entirely in the heat of the pan. You absolutely MUST have a heavy skillet, and honestly, cast iron is your best friend here for holding that intense, consistent temperature. Put that pan on medium-high heat and let it warm up—and I mean *warm up*. We want that skillet screaming hot before the tuna even thinks about going in. The golden rule: Do NOT add any extra oil to the pan if you used the marinade above. That sesame oil in the marinade is all the lubrication we need!
Once the pan is smoking hot (yes, it needs to be that hot!), gently place your sesame-seed-crusted steaks right in the middle. You should hear a beautiful, aggressive sizzle immediately. That sound means you’re doing it right! Now, set your timer, because speed is everything. For almost raw, cool-centered tuna—the way I prefer my healthy dinner tonight—we are searing for just 1 to 2 minutes per side. Don’t touch them, don’t peek, just let the heat bloom that crust. After that time is up, flip them over and hit the other side for the exact same amount of time.
Achieving the Ideal Doneness for Your Seared Ahi Tuna
This is where everyone gets nervous because tuna cooks shockingly fast! Remember, we are not cooking this all the way through; we are just heating the outside layer. If you like your tuna seriously cool in the center—think barely warmed raw sashimi—stick rigidly to 90 seconds per side. If you’ve got a preference for a slightly warmer, medium-rare center, you can push it to 2 full minutes per side. I know what you’re thinking: ‘What if I cook it too long?’ Well, if you overcook it, it turns gray and chewy, and honestly, that’s just sad. So when in doubt, pull it off early! You can always put it back in for 15 more seconds, but you can’t take the heat away once you’ve added it!
Resting and Slicing: Final Steps for Your Seared Ahi Tuna
Woah! They look absolutely gorgeous out of that screaming-hot pan, right? But hold your horses just for a second because this next part is just as important for keeping that perfect texture. Resist the urge to grab a knife immediately! We absolutely must let these beautiful steaks rest. I know, I know, waiting is the hardest part of cooking anything delicious, but if you slice into them right away, all those fantastic juices we just trapped inside will pour out onto your cutting board instead of staying in the fish.
Transfer your seared steaks onto a clean cutting board, and let them chill out for about 3 minutes. This resting period lets the muscle fibers relax and redistribute the moisture throughout the steak. Think of it like letting a fancy steak tenderize a bit right on the counter. It’s a small step, but it’s the difference between a slightly dry bite and a truly melt-in-your-mouth experience—that’s that little bit of expertise showing through!
Once rested, it’s time for the slicing! You want to use your sharpest knife for this part. The trick to keeping your Seared Ahi Tuna tender is slicing thinly *against the grain*. If you look closely at the steak, you’ll see the muscle fibers running in one direction. You need to cut perpendicular to those lines. Slicing with the grain makes the meat stringy, but slicing against it separates those fibers, resulting in super tender pieces.
Don’t worry about making perfect, uniform slices, just keep them thin—about a quarter-inch thick is perfect. And remember that final little sprinkle of black pepper right before serving? Now is the time to do it! They are ready to plate up immediately. Don’t let them sit after slicing, because the residual heat will keep cooking them slightly once they’re cut.
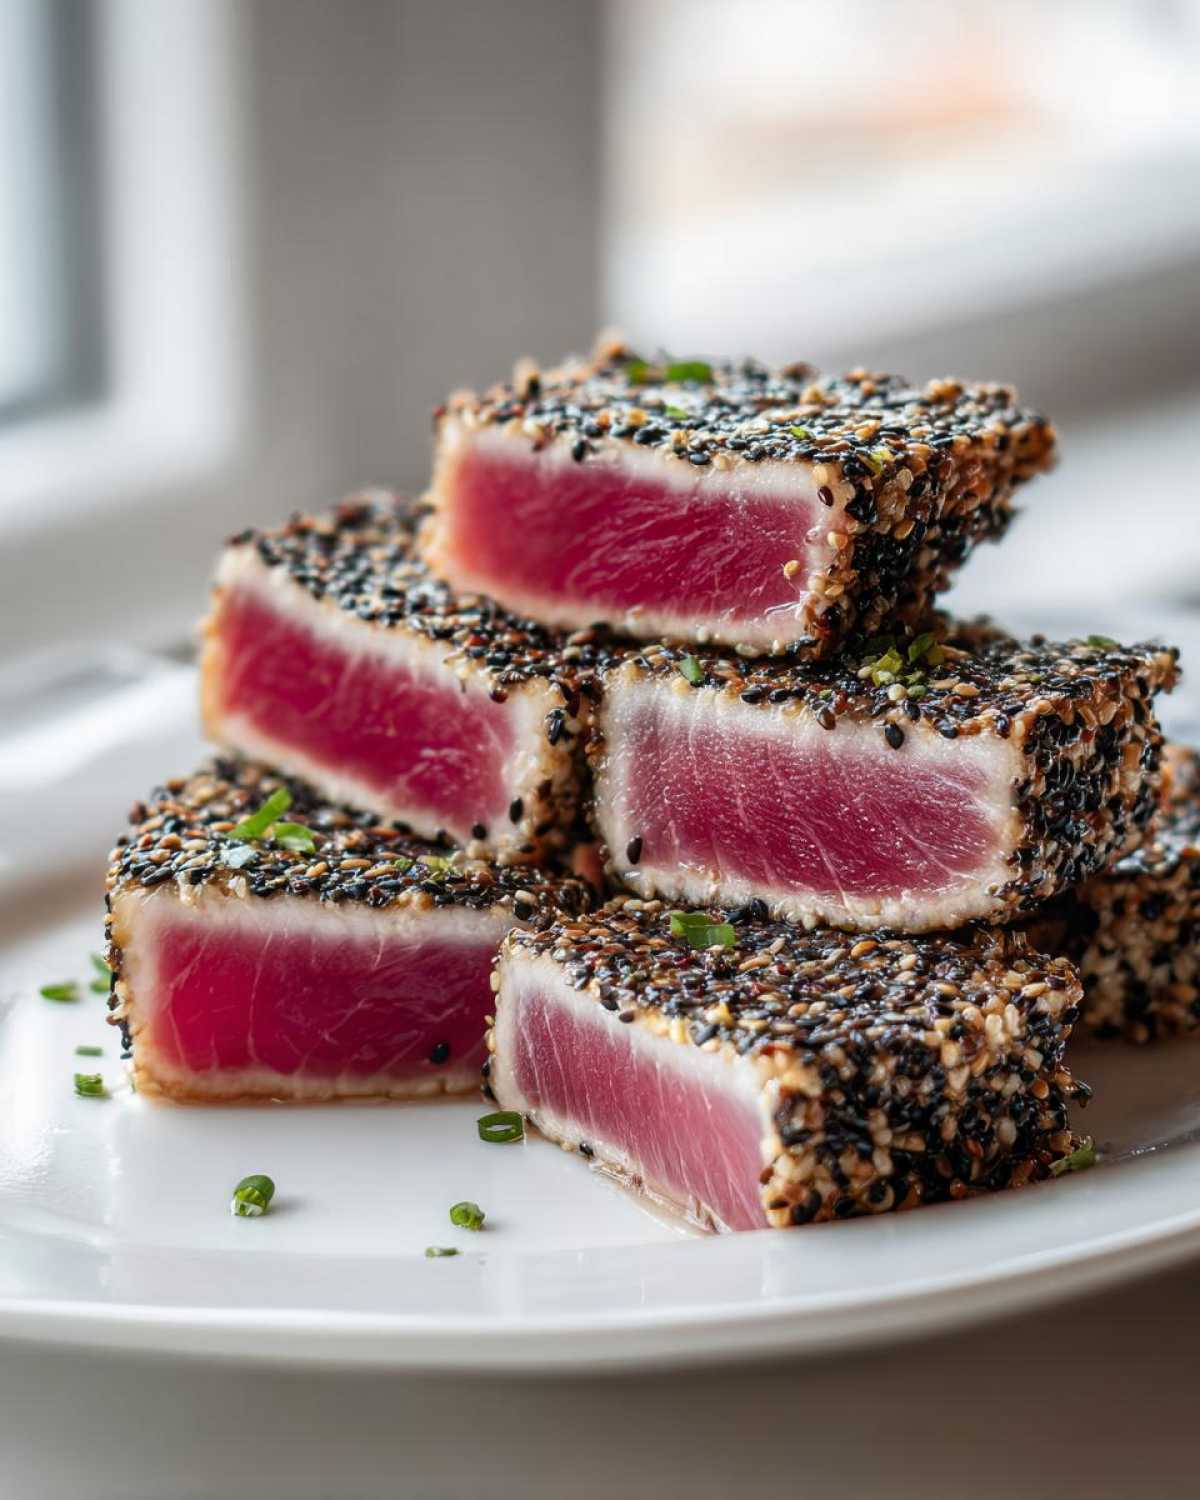
Serving Suggestions for this Asian Tuna Recipe
So you’ve got these gorgeous, perfectly seared steaks—now what? We need equally fantastic partners to make this a full, satisfying meal. Since this whole flavor profile leans beautifully East Asian, you can’t go wrong keeping the sides simple and fresh. My absolute favorite way to present this is over a bed of perfectly steamed jasmine rice; it soaks up any little bit of marinade that might drip off the fish, and it feels so satisfying!
If you want something lighter, skip the rice and serve your sliced tuna over a giant bowl of simple greens—maybe some butter lettuce or even thinly sliced cucumber. A drizzle of rice vinegar and a tiny dash of neutral oil dresses it up perfectly without fighting the sesame flavor we worked so hard to achieve. I’m also a sucker for a very thin, homemade soy-ginger dipping sauce, although honestly, the crust does most of the flavor work for you!
If you happen to be making other things that day, this tuna pairs wonderfully with something robust but not too assertive, like my sweet and spicy pork if you’re feeling ambitious, or just some quick steamed asparagus. The key is making sure the sides are quick, allowing the fantastic crust on your gourmet tuna to truly be the star of the show!
Storage and Reheating Instructions for Leftover Seared Ahi Tuna
I’m going to be upfront with you: this dish is definitely best eaten immediately. That beautiful, barely-cooked, cool center combined with that warm, oniony crust? That’s a fleeting, magical moment, and once you slice it and it sits, that texture starts to change rapidly. So, ideally, make just what you plan to eat!
But hey, life happens, right? If you unexpectedly end up with a slice or two of leftover Seared Ahi Tuna, don’t toss it! You can absolutely safely store it, but you have to manage your expectations for reheating. First things first: once any tuna is fully cooked through (if you accidentally over-seared it), it keeps okay in the fridge for maybe one day, but two days maximum.
Here’s the crucial part: Do NOT try to reheat it using high heat, like putting it back in that hot skillet or zapping it in the microwave. That lovely rare center will turn tough, gray, and dry faster than you can say ‘Asian tuna recipe.’ That’s a big, fat no-no in my kitchen!
If you want to salvage leftovers and keep it nice, the best way is to eat it cold. Think of it almost like you’re eating a leftover piece of very fancy, pre-cooked salmon. You can flake the cold tuna over a fresh salad—maybe add a squeeze of fresh lime juice—or gently fold it into a creamy avocado mash. Eating it cold maintains whatever texture is left and it still tastes great with the sesame crust flavor still clinging on. If you absolutely *must* warm it slightly, use a very low setting on a non-stick pan and heat it for mere seconds, but really, cold is where it shines when dealing with leftovers.
Frequently Asked Questions About Seared Ahi Tuna
I know once people start making this Seared Ahi Tuna, they get hooked, but sometimes questions pop up about sourcing or side dishes. That’s totally normal when you’re dealing with such a specific, high-quality piece of fish! I’ve gathered a few things people ask me all the time about making this dish a regular in their rotation. Don’t be shy about asking—we all learn as we go in the kitchen! For more general cooking tips and ideas, check out my blog!
Is it safe to eat raw Seared Ahi Tuna?
That is the *most* important question when you’re dealing with fish where the center stays raw! The short answer is yes, but only if you take real precautions. You absolutely must use fish labeled as sushi grade tuna or sashimi-grade. That label means the fish has usually been flash-frozen at specific, extremely low temperatures to kill any potential parasites, making it safe for raw consumption once thawed carefully. If you buy regular fresh tuna from the counter, it hasn’t gone through that process, so you should always sear those steaks all the way through. For this recipe, sticking to true sushi grade is your safety net!
Can I use frozen tuna steaks?
Yes, you absolutely can! In fact, that’s often how I get the best quality fish, especially if the fresh selection isn’t great. The trick here is thawing management. Never, ever thaw tuna on the counter at room temperature; it warms the exterior too quickly. The safest way is to leave the vacuum-sealed package in the refrigerator overnight—that slow thaw keeps the fish structure nice and firm. When it’s ready to use, you want it to be cold to the touch but no longer icy in the center. This super-cold temperature helps you get that amazing sear without overcooking the interior!
What pan is best for achieving such a crisp crust?
If you want that stunning crust, you need density and heat retention, and that means cast iron is king! I’ve tried stainless steel, but it just doesn’t hold the temperature consistently when you lay a cold piece of fish on it. A regular non-stick pan tends to warp under the intense heat we need here, which leads to uneven searing. A heavy, pre-heated cast iron skillet ensures the entire surface of your tuna makes even contact with high heat, giving you that perfect, crunchy sesame crust every single time. Don’t even think about using non-stick if you want that fantastic texture for this quick seafood recipe.
How do I make this a complete healthy dinner?
This recipe itself is naturally a fantastic, low-fat option—it’s packed with protein and healthy fats from the sesame oil! To round it out into a truly gorgeous and balanced healthy dinner, you want something clean to go alongside it. I usually pair it with a large bowl of lightly seasoned brown rice, which adds fiber and makes the meal feel much more substantial. Alternatively, a simple side of steamed asparagus or a quick slaw made with cabbage and a light rice vinegar dressing works wonders. Keep the sides light so they don’t fight what is truly a gourmet tuna experience!
What is the difference between ahi and yellowfin tuna?
This one trips a lot of people up! Generally, when you see “Ahi” at the store, it refers to either Yellowfin or Bigeye tuna. They are both considered high-quality, leaner, deep-sea fish perfect for searing. Technically, Ahi is the Hawaiian name for yellowfin tuna, but in the US market, grocery stores often use the terms interchangeably for anything that looks deep red and solid. For this recipe, either works perfectly, as long as it’s marked for raw preparation! If you want more general cooking tips and ideas, check out my blog!
Recipe Snapshot and Next Steps
I know that seeing a recipe laid out like this makes it feel incredibly official, but honestly, it’s just so simple! Since this is a very lean, high-protein dish, it’s such a fantastic way to get a gourmet feel without loading up on excess carbs or fat. If you look at the big picture, this is incredibly nourishing for a quick meal.
Here’s what you can generally expect from one 6-ounce steak serving:
- Calories: Around 250 calories—that’s phenomenal for a delicious dinner!
- Protein Power: You’re getting about 28 grams of fantastic protein, which keeps you feeling satisfied for hours.
- Fat Content: It’s low in total fat (about 14g), with most of that being the healthy unsaturated fats from our sesame oil marinade.
Remember, these are estimates, and they can shift slightly based on the exact cut of yellowfin tuna you purchase. For all the full legal details on how these numbers are calculated, you can always check out my disclaimer page.
That’s it! You made restaurant-quality Seared Ahi Tuna in basically 9 minutes flat. I’m so excited for you to try this out. Once you’ve sliced it up and served it, please hop back here and let me know how that sear turned out! Were your seeds perfectly toasted? Drop a rating below so everyone knows just how fantastic this quick seafood recipe is!
PrintSimple Seared Ahi Tuna Steaks
A quick recipe for perfectly seared sushi-grade Ahi tuna with an Asian-inspired crust.
- Prep Time: 5 min
- Cook Time: 4 min
- Total Time: 9 min
- Yield: 2 servings
- Category: Dinner
- Method: Pan-Searing
- Cuisine: Asian-Inspired
- Diet: Low Fat
Ingredients
- 2 (6 ounce) sushi-grade Ahi tuna steaks
- 2 tablespoons sesame oil
- 1 tablespoon soy sauce or tamari
- 1 teaspoon grated fresh ginger
- 1 clove garlic, minced
- 1 tablespoon black sesame seeds
- 1 tablespoon white sesame seeds
- Pinch of black pepper
Instructions
- In a small bowl, whisk together the sesame oil, soy sauce, ginger, and garlic. Brush this mixture evenly over all sides of the tuna steaks.
- On a plate, mix the black and white sesame seeds. Press each side of the tuna steaks into the seed mixture until well coated.
- Heat a heavy skillet (cast iron is best) over medium-high heat until very hot. Do not add extra oil to the pan.
- Carefully place the coated tuna steaks in the hot skillet. Sear for 1 to 2 minutes per side for rare to medium-rare.
- Remove the tuna from the pan immediately. Let the steaks rest on a cutting board for 3 minutes before slicing thinly against the grain.
- Serve immediately with pepper sprinkled on top.
Notes
- For best results, ensure your tuna is very cold before searing.
- Adjust searing time based on your preferred doneness; 90 seconds per side yields a cool, raw center.
- Use tamari instead of soy sauce for a gluten-free option.
Nutrition
- Serving Size: 1 steak
- Calories: 250
- Sugar: 1
- Sodium: 350
- Fat: 14
- Saturated Fat: 2
- Unsaturated Fat: 12
- Trans Fat: 0
- Carbohydrates: 3
- Fiber: 1
- Protein: 28
- Cholesterol: 65